Link Tab in Website Properties

The settings on this tab apply to the selected object(s) or selected text. Typically you use this tab to add a link to an object on your web page (eg. a button or photo), or to some text, so that when a visitor to your site clicks on the object/text, they are redirected to another page. You can add links to other pages in your website, to a URL (web address) or even cause a pop-up window to appear.
To add a link to just some of the words in a paragraph of text, go into the Text Tool and drag over the text you want to link, to select it. Then set up the link in this tab.
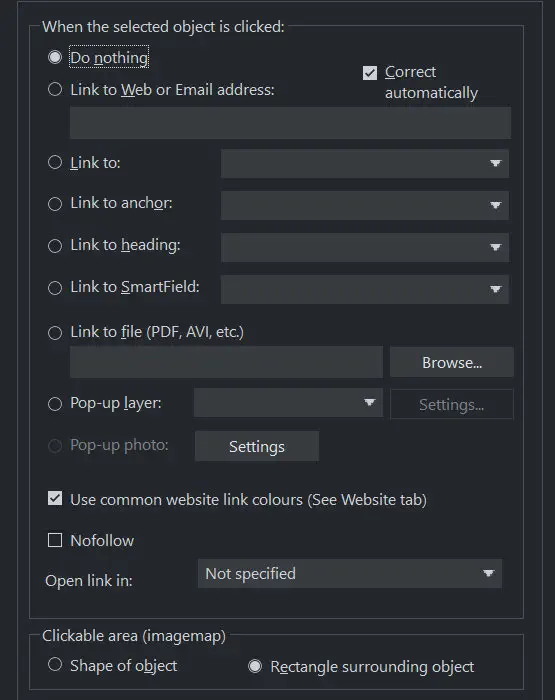
The main section of this tab allows you to choose what should happen when the selected object or text is clicked.
Link to web address
Enter a web or email address to link to that address. If you leave the "Correct address automatically" checkbox selected, your address will be adjusted if required when you click OK or Apply. For example, if you enter "www.Xara.com" it will correct it to "http://www.Xara.com/".
You can put an email address in the Link address field, in which case clicking the link will launch the reader's email program with the To: field filled in. You can also optionally specify the subject line to be used, add CC or BCC email addresses to be copied on the email and even specify the default body text to be used. For example this sets the To email address and all four optional parameters:
yourname@wherever.com subject:Email from website cc:another@wherever.com bcc:yetanother@wherever.com body:Auto-generated email
Technical note: Xara encodes your email address to reduce the likelihood that SPAM robots will find your email address from the web page. This requires Javascript to be enabled in the browser (currently >95% of browsers).
Link to...
Select this option to link to another page in the current website, or if you are in a presentation document, to link to the next or previous presentation step. The drop-down list allows you to select which page or step to link to. You can also choose this option to link an object to the top of the page - creating a rapid jump from the bottom of a long page to the top.
TIP: If you have many pages in your website document, giving each one a name makes it much easier to set up and maintain your page links, because the page list will show the page names instead of just "Page 2", "Page 3", etc.
|
|
See the Page Tab section below for details of how to setup page names, or edit the names in the Page & Layer Gallery. |

In addition to an entry for each page in your site, the dropdown list also contains the special entries Next page/Presentation step, Previous page/Presentation step and Top of Page .
Next/Previous page
Use these to add a link which leads to the next or previous page in your site. For the purposes of such links, the page order is determined by the order of the pages as they appear in Xara. A "next" link on the last page links to the first page and a "previous" link on the first page links to the last page.
Next/Previous presentation step
Use these to add a link which leads to the next or previous presentation step in your site, if your website is a presentation document. The presentation order is also determined by the order of the steps as they appear in Xara, similar to next/previous page.
Top of page
If you want to link back to the top of a particularly long page - create an object at the bottom of your page (typically a button or a text object) and then select the "Top of page" link option. The link will then take you straight up to the top of the page.
Link to anchor
This option allows you to jump the visitor to a specific part of any page in your website.
To setup an anchor point, first go to the page and object you want to be jumped to. Select the object and add a name to it by right clicking and choosing the Names... option. Then select the object to which you want to add the link and choose the anchor name you added from the list provided with the "Link to anchor" option.
Note that when you link to an object which is a long way down a web page, the web browser automatically scrolls the page down so that your anchor object is visible.
Note: You cannot apply a transition to a link to an anchor.
Link to heading
Link automatically to any of the headings within the document. This saves you the bother of having to trawl through a long document when you want to link to a particular section.
Click on the dropdown to see the list of headings. Then choose the heading you want your selected text or object to link to from the list. Bear in mind that the heading must have a heading text style assigned for it to appear in the list.
The list is divided according to pages, and then subsequent headings with each heading occupying an indented position according to its outline level.
Link to SmartField
Link to Personal or Document SmartFields which contain URLs. See SmartFields for more information.
Link to File
This link option is useful if you want to add a document, movie or any other file to your website to make it available to your visitors. For example you may have a PDF document that you want to make available.
Select the object or text that you want to link. Then turn on this Link to file option and use the Browse button to browse for the file on your computer. The name of the file appears in the text field to the left of the Browse button. Click OK and your link is applied.
As well as applying the link, Xara has now taken a copy of your file and placed it in the support folder for your design. This is a folder next to your .web or .xar file. If your design is called "MySite.web", the support folder will be called "MySite_web_files" alongside it. All the files in the support folder get published along with your website and so that means your file will be published with your website and so the link you just added will work. See the Document Handling chapter for more information on support folders.
Note: Because there is a separate copy of your file held in the support folder for your design, you need to update that copy whenever you modify the file and want to publish the modified version. Or you can just go through the above linking process again and browse for your updated file. Also if you move or copy your website design to another computer, or give a copy to someone else, you need to make sure the support folder accompanies the design file, since it now contains an important part of your website!
Note: You cannot apply a transition to a link to a file.
Pop-up layer
You can add any content you like to a separate layer on your page and have that content shown as a pop-up only when your visitor clicks on a link. For example you could add some descriptive text about a photo on your web page and have that text only shown to the user if they click on the photo.
|
To add a popup layer, first you need to add the layer itself using the Page & Layer Gallery and add your pop-up content to that layer. |
|
See the Page & Layer Gallery chapter for full details. Then you can select the layer from the layer list provided next to the "Pop-up layer" option.
You can also add a transition effect which is applied when the layer appears. In the Page & Layer Gallery, open the layer properties so that you can apply a transition directly to a layer to achieve an animated effect when the layer contents appear. Or you can click the Settings button next to the pop-up layer option in the Link tab, to access the same layer properties.
Now when a visitor clicks on your object, the layer contents appear! By default, clicking anywhere else on the page makes the pop-up disappear again. But you can make the pop-up layer stay up until it's explicitly closed by the viewer. Just unselect the Close pop-up automatically checkbox in the Layer properties dialog. Then a close button is included in the top right of the pop-up, and it stays on screen until the close button is pressed.
Note that you can also get to the Layer properties by clicking the "Settings…" button next to the pop-up layer option in the Link dialog.
Note that all the content on the pop-up layer is loaded as soon as the visitor visits your page. So if you want to provide a lot of pop-up photos, use the Pop-up Photo feature described below instead.
Pop-up photo
This option gives you a very easy way to add pop-up photos and other photo gallery features to your website, without adding any layers! Simply import your photo and use the Selector Tool to scale it right down so it appears as just a small photo thumbnail on your webpage. Then select it and choose this "Pop-up photo" option.
Click the Settings button next to this option to go to the Image tab, where you can set the size of the pop-up photo, add a title and caption, and choose from many other options. See the Image tab section below for details. Selecting the pop-up photo option on this Link tab, also selects the pop-up photo checkbox on the Image tab – both turn on the same pop-up behavior.
Use common website link colors
This option lets you choose how the selected text link should be displayed. It is selected by default, meaning that the text link will show with the link color you have defined for the whole website. You can set this color on the Website tab (see Website Tab section).
If you uncheck this option, then the selected text link will keep the color that you give it on the page. So you can give different links different colors if desired.
Open link in
This option does nothing if either of the "Pop-up layer" or "Pop-up photo" link options are selected. But for other links it allows you to tell the web browser how the target web page should be loaded. By default it is set to "Not specified" which usually means the browser will open the link in the same browser window and frame as the link.
The dropdown list contains four options that cause the browser to do special things. You can select one of these options, or type in the name of a frame:
New window or Tab (_blank) Open the link in a new browser window.
Same frame (_self) Open the link in this frame (the frame that contains this object).
Parent frame (_parent) Open the link into the parent window or frameset that contains this frame.
Same window (_top) Open the link into the main browser window, replacing any existing frames.
If you want the link to be loaded into a specific frame in the browser, type the name of the frame in this field.
Nofollow links
You can find this option within the dialog Web Properties > Link dialog. When a link is set to Nofollow, it tells search engines that encounter the link not to follow it for ranking and indexing purposes, for example if you link to another website outside of your domain.

Exactly how search engines use this information varies with each search engine and may change in the future.
Clickable area
This option lets you specify what area of the object must be clicked on to invoke the link. However it is not supported for HTML websites (the rectangle surrounding the object is always used), but is used for image maps.
Shape of object: The user must click inside the exact outline of the object to invoke the link.
Rectangle surrounding object: The user can click anywhere in the rectangle surrounding the object (the bounding box) to invoke the link.
Copyright © Xara